Knowledge Base
- Home
- Roles ▼
- Registration ▼
- Main Dashboard ▼
- Project Management ▼
- Crew Management
- Resource Management ▼
- Form Builder ▼
- Safety Management ▼
- Documentation Management ▼
- New Submission
- Global Communications
- Timesheet Management ▼
- Reports ▼
- Chats
- Time Off Management
- Profile
- Subscriptions
- Location Tracking Behavior on iOS and Android
- FAQs
- Troubleshooting
Company Admin
Description of the Role
The Company Admin (also called Account Owner) is the highest-level administrative role in Geo-Cx. This role has complete control over the company’s account and is responsible for managing access, subscriptions, and organizational settings. The Company Admin primarily oversees platform operations. While typically not granted app access, if your company is small and lacks a Construction Manager, the Company Admin can assume this role. This dual role enables access to all Construction Manager features within the app.
Main Responsibilities
Full Access Control: Can access all features and modules within Geo-Cx (timesheets, projects, resource management, reports, safety, etc.).
User & Role Management: Can create and manage Construction Managers, Foremen, and Technicians. Each user includes details such as: name, email, phone number, hourly rate, and overtime rate.
Invitations & Onboarding: Can send invitations to new users via email. The invitation includes a link to download the Geo-Cx mobile app (Google Play / App Store). Once the user accepts, they verify their account and can start using the platform.
Subscription Management: Has the exclusive ability to purchase licenses, assign them to team members, and manage billing preferences (monthly or yearly).
Company Setup: Defines company-wide settings, such as projects, geofences, timesheet policies, lunch/break logic, and safety management preferences.
Compliance Oversight: Ensures all data (time tracking, location, safety reports) is accurately stored and accessible for auditing and payroll.
Who should be Company Admin?
This role can be assigned to the business owner, operations director, or senior manager who oversees workforce deployment and has authority over budgets and compliance.
Geo-Cx Web Instructions
Register in Geo-Cx and Log In
Register on the platform here. After registration, check your email to verify your account and complete your profile by clicking the top right corner next to your avatar menu.
Verify Your Account in Geo-Cx
Verify your account and set your password on the platform following the email sent by Geo-Cx. Complete your profile by clicking the top right corner next to your avatar menu.
After being verified, you can log in to access the web platform and the mobile app.
2. Main Dashboard
After logging in, the first thing you will see is the Main Dashboard. Here, you can view all metrics related to the company’s projects.
3. Project Dashboard
The Project Dashboard on the Geo-Cx platform serves as a vital tool for Company Admin, Construction Manager and Foreman, providing real-time insights and actionable data across multiple project dimensions such as safety, crew management, and financials. This enables effective decision-making and enhances the overall management of the project lifecycle.
4. Project Management
Add a new projects, fill in details for Customer, Project, and Shift. Additionally, add Geo-Fencing and Custom Fields.
5. Crew Management
Efficiently allocate resources in crews to maximize effectiveness.
6. Resource Management
Add New Users with details. Opt to send an invitation via SMS so they can download the app. Also, you can add in bulk by filling the CSV sample.
7. Safety Management
Here, you can report injuries and submit forms. Additionally, if you have also Construction Manager Role and you are assigned to the Safety Rep. role, you’ll have access to a menu titled ‘My Missed Audits.’ This allows you to submit any audits you may have missed. After your shift, you will receive push notifications to inform you of any audits missed during the day.
8. Global Communications
Create and schedule push notifications for a project or all projects.
9. Timesheet Management
Please remember to regularly update your timesheet by accessing the ‘Own’ section. This will display your time records at the end of each shift. At the end of the week in the ‘Other’ section, review and validate technician’s timesheets. If necessary, add comments regarding the technician’s reported hours. Don’t forget to submit your own timesheet as well.
10. Reports
View Timesheet Reports, Summary Reports, and Custom Reports.
11. Chats
Send messages to individual users or crews and share images and files (up to 50 Mb).
Geo-Cx App Instructions
By default, Company Admins do not have access to the Geo-Cx Mobile App. The mobile application is designed for field and site roles such as Construction Managers, Foremen, and Technicians.
If you, as a Company Admin, want to use the mobile app, you will need to follow these steps:
Step-by-Step Instructions
Log in to your Geo-Cx account through the web platform.
Navigate to your Profile Settings.
Under your role section, switch the toggle “Enable Construction Manager Role”.
Go to the Resource Management panel.
From there, send an invitation to your own user (email address).
You will receive a formal invitation SMS with a link to download the app.
The SMS contains direct links to the Google Play Store and Apple App Store.
Download and install the Geo-Cx App from the official store.
Open the app and log in using your credentials to start using the mobile features.
After receiving an invitation via SMS, download and install the app. Register your phone number by verifying the OTP and set a new PIN. Once logged in, please accept the Location Permissions. If you need to learn more about location permissions in Android please click here. For iOS users refer to this link.
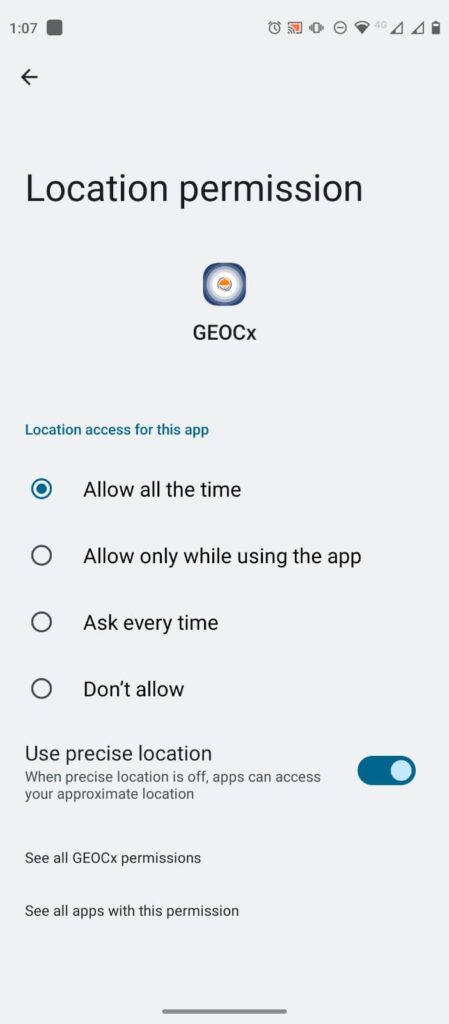
Location Permissions Android
To enable Geo-Cx to track work-related locations, please set location tracking to ‘Allow all the time.’ Be assured, we do not track your location when you are not clocked in.
If ‘Use precise location’ is not already selected, please click on the toggle to activate it.
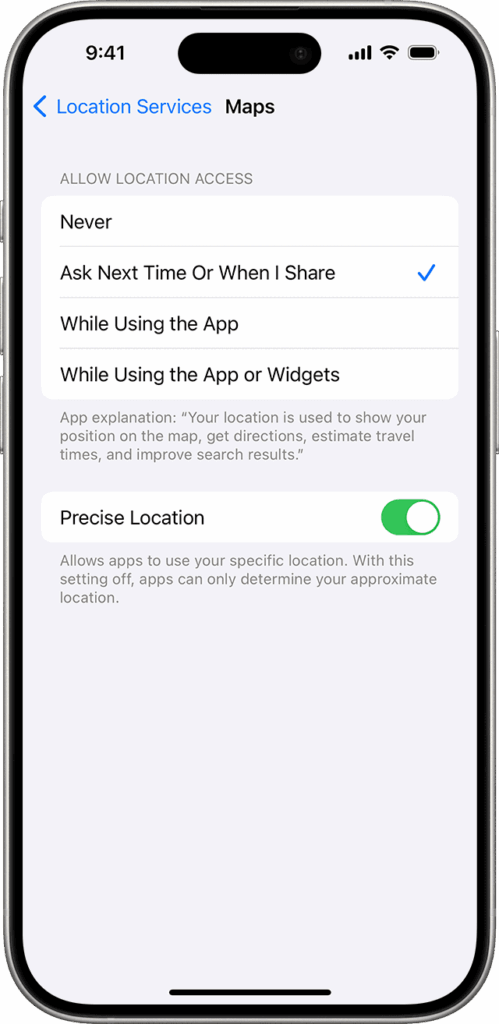
Location Permissions iOS
To enable Geo-Cx to track work-related locations, please set location tracking to ‘While Using the App’ Be assured, we do not track your location when you are not clocked in.
If ‘precise location’ is not already selected, please click on the toggle to activate it.
Geo-Cx App Menu
While typically not granted app access, if your company is small and lacks a Construction Manager, the Company Admin can assume this role. This dual role enables access to all Construction Manager features within the app. Check more details here.
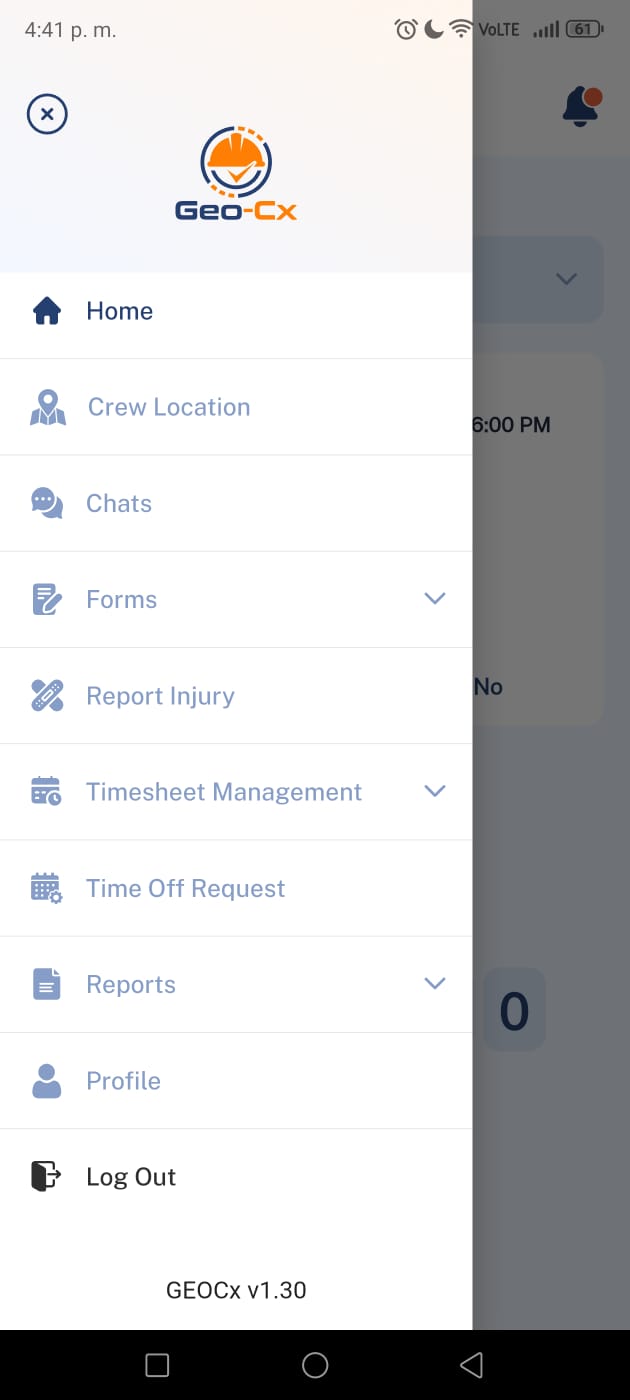
The Geo-Cx App Menu is your main navigation hub within the mobile app. Each section provides access to a core function of your daily workflow:
Chats: Communicate instantly with team members.
Forms: Submit audits, inspections, checklists, and project documentation.
Report Injury: Capture incidents in real time and notify supervisors.
Timesheet Management: Review and manage daily clock-ins and clock-outs.
Time Off Management/Request: Submit or approve time-off and PTO requests.
Reports: Access crew-level reports such as time attendance.
Profile: Update your personal information and view your role settings.
Use this menu anytime to switch between tasks efficiently and keep your project activities organized.
Home (Punch In/Out)
Select a project to punch in. Record today’s activities and use lunch/break as needed. Punch out at shift end. If injured, submit an injury report. Post-shift, you’ll receive an overtime notification—respond accordingly. Please note that in order to punch in, you need to fulfill some requirements, please access the section by clicking the button below to see more details.
2. Crew Location
Monitor Crew Location on the map. See Foremen and Technicians.
3. Chats
Send messages to individual users or crews and share images and files (up to 50 Mb).
4. Forms
Submit audits, inspections, incident reports, impact reports, expense requests, and other types of field forms.
5. Report Injury
Report any injury by submitting details and upload pictures.
6. Timesheet Management
Please remember to regularly update your timesheet by accessing the ‘Own’ section. This will display your time records at the end of each shift. At the end of the week in the ‘Other’ section, review and validate technician’s timesheets. If necessary, add comments regarding the technician’s reported hours. Don’t forget to submit your own timesheet as well.
7. Time Off Management
Review pending Time Off Requests, examine the reasons provided, and either approve or deny them. Additionally, categorize each request as PTO, non-PTO, bereavement, sick leave, or holiday.
8. Time Off Request
Submit a Time Off Request, select the date range and reason.
9. Reports
View Timesheet Reports, Summary Reports, and Custom Reports.
10. Profile
Change your personal details (Name, Image, and PIN).